Wednesday, June 4, 2014

Lego Robotics Challenge # 1 & 2

Lego Robotics Challenge #1

Lego Robotics Challenge #2

To complete the challenges, our group (Chris, Max, Owen) programmed the car by simply using the move blocks, and having the motors move for a certain amount of time.

It was not as efficient, but it worked out in the end. In order to get it right, a lot of trial and error was needed to find that right times when programming it.

Problems we encountered during the process.
  • Our team struggled to build the actual car to hold the controller
  • As a result, we missed the chance to participate in the actual race against the other teams
    • We ended up having the recreate the challenges ourselves
  • In the video, the car did not move straight, it would go to the right a little
    • We discovered the problem was the the front right wheel was not the same size as the rest
    • Once we replaced the tire, it moved perfectly straight
Revisions that could have been made
  • If given more time, we would have definitely incorporated the sensor inputs when programming the car
    • The ultrasonic sensor could have been used to sense an object in its path. When it gets close enough to that object, we could program it to turn. We could have used it to navigate the course.  

Friday, May 30, 2014

Triangle bridge holding weight much stronger than its own


 triangles balance the universe

Our first prototype was basically the same design. But we made a couple changes.

1) Made the height of the triangles smaller

2) Used more triangles for more support, and stability. We noticed that the taller we made the triangles, the more it leaned to the side, so we fixed that by shortening the height of the bridge.


this triangle was made from 51.6 grams of wood and glue and held 700batteries 20 pounds (9071.85 grams)

This makes the strength to weight ratio about 176:1

The string broke. The triangle succeeded, and does its natural wonders again.        

  the bridge of distance 

when steps are made in the mind. one step at a time.


Thursday, March 6, 2014

3.1.6 Open and Closed Loop Systems

In this assignment we learned about open and closed loop systems. 
Open loop systems run without ever knowing the job they are doing.
Closed loop systems loop systems run, but give feedback to the device.


Video of our open loop system. We controlled a motor driven on a track.


Our closed circuit system


Program for circuit system

Thursday, February 20, 2014

3.1.5 Variable Functions

In this packet, we were introduced into the plus block function, variable function block, and branch function block. 

Timeserver the program passes through the Plus function block, it adds a value to the block on the right block. And the variable function block keeps track of the value. 

The Branch Function Block is similar to the analog function block, except the branch retrieves information from whatever value is provided through the information node. In this case, the variable function block.

We used what we learned to turn on a lamp for a certain amount of time. 

Here is the lamp, and how it responds to the program. 

Wednesday, February 19, 2014

Super Advertising: 2014 Volkswagen Game Day Commercial: Wings


With the Super Bowl coming this past weekend, many companies spent big bucks securing their spots for slots on the air. For 30 seconds of air-time, a company must pay $4 million. The commercial that we chose, the "Volkswagen Wing Commercial", Volkswagen had to drop $8 million for it's minute long airing. With this, Volkswagen would have to sell 178 of it's most expensive 2014 model. (2014 Touareg coming in at $45,000) in order to make up that money. Above is the video to the commercial.

3.1.3 Basic Programming

In this worksheet, we learned to program a motor to run for a set amount of time. We were introduced to the basic program elements like Start, M1 output, Timd Delay, and End Program.

This is our flowchart, with text to show what each block does.

3.1.4 Branch Functions

As a gropu, we learned the difference between digital and analog functions. Digital is when the action is to turn off/off and analog is when there is a scale of a different values applied. We also learned that branch functions offer the program to make a decision because every branch function is a yes/no question. Programming two switches to have different jobs under the same function was something else we learned. With help from Mr. Olsen, we were able to learn how to use the potentiometer, which led us to be able to dim a light, because the potentiometer behaves as an analog device. It's important because there can be different outcomes for the same input.

This is our branch function with multiple decisions based on the value of the potentiometer, which let us dim the light.


This is our potentiometer.

Wednesday, February 12, 2014

3.1.1 Inputs and Outputs


In this activity, our group learned about digital inputs and analog inputs. We also learned about outputs, and how they can be used to control a buzzer and motor, by using the fischertechnik ROBO TX Controller.


 Digital Inputs
Switch normally open, no voltage present


Press switch, voltage now present. Represented by 1.


Mini Switch normally closed. Voltage present without pressing switch.
Press the switch, no more voltage present 


Analog Inputs
Using the Potentiometer to resemble analog inputs

Outputs

Motor output spinning


Test Interface allows us to control the inputs and outputs. In this case, the motor output.


Thursday, December 19, 2013

Manila Folder Bridge Build


These 2 pictures are from our final result from the 2 manila folder poles. The total is 57 magazines.
21 magazines, and then 36 from the other.

More Pictures


Monday, December 16, 2013

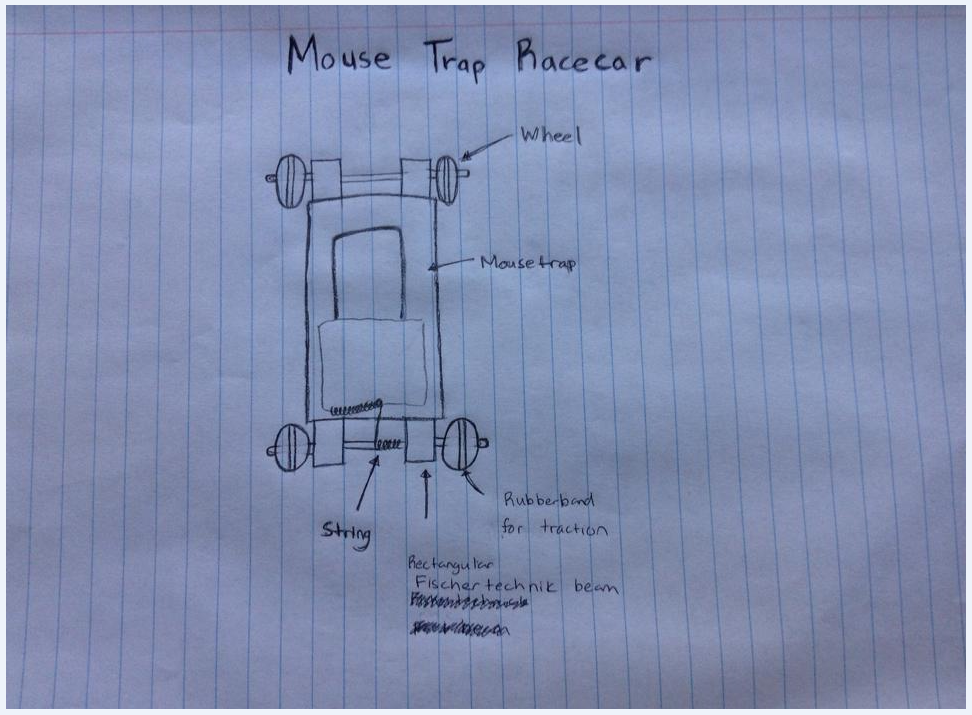
Mouse Trap Race Car

Team members: Chris Ruiz, Max LeBaron, Owen Heidenreich

We are claiming 7 achievements


Design stage:

Visualize It! 
Create a sketch of a design and label key features.


Build stage: 

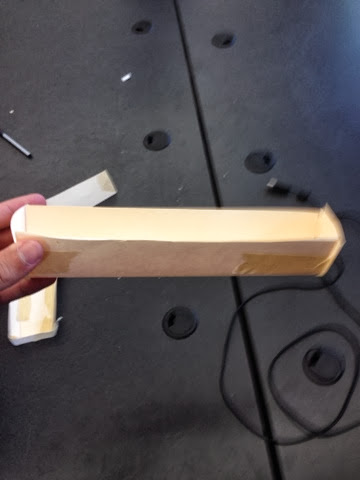
Build It
build your design, document it with a photo


Test Compete stage:
"Competitor -  Compete in the mouse trap racecar challenge
We competed in second annual mouse trap racecar and we placed in last place

Feedback  Collect feedback (at least one each of +, change, ? and !) from yourself or your classmates.
Change: Max says We should have asked more questions about how to build it
!: owen built the race car by himself
?: a lingering question we have is "How does the string accelerate the mousetrap?"
+: Positive, we were all genuinely interested in this challenge.

Iterate stage :

Game Changer Develop a new rule or change to the game that you feel would make the event better. Explain your concept.
"No sticks":There should be no sticks to attach to the mouse trapper to create more leverage with the accelerator. This means that instead of the mouse trap clapper being its usual length of about 4 inches, people were attaching a long pole to the mouse trap and then putting their string at the end of that pole so that the mouse trap would act as if it were far greater than four inches, which would then create an advantage as the car would travel faster and further.

Name it - Invent a name for an achievement that you think is better than what we have currently.
The achievement that is named "The Price of Glory" should be named "Graft" because in politics a graft is the unscrupulous use of a politician's authority for personal gain ie. bribing people for votes.
 The person is buying things that give them an advantage in the race, therefore they are a Graft. This name will also provoke questions related to this word which will hopefully encourage them to learn more.

Reflection stage:

Build/Design 
What is a "Design/Build" process? How did your experience with this challenge relate to that? Why might you experience this in a career related to technical innovation?

A design/build process is more than just a physical design and build but it is also a test of perseverance and social orginization skills. It is also a test of motivation and willingness to work hard to achieve a goal. Our experience with this challenge demonstrated that our group unfortunately lacked the collective motivation and willingness to achieve our goal which was to win the Mousetrap racecar. I will experience this in a career related to technical innovation because plenty of communication and clarity is required to pull-off any feat in innovation.

Cardboard Canoe Challenge 2013

Cardboard Canoe Challenge Round 2

Partners: Erik, Owen, Ben, Max

Team Name: Super Saiyens


Summary: Our team took on the Cardboard Canoe Challenge, and were able to earn many achievements. We followed the criteria, making our canoe out of cardboard and duct tape. We worked together, and completed our boat quickly. 

Achievements:

Criteria• Build a watercraft that allows you to traverse the CHS swimming pool.
• Your "boat" must float at least one student through the course of the competition.
• Protect your workspace from damage!

Constraints
• You may only use Cardboard and Duct Tape for this event.
• All Staples or other foreign material must be removed from your cardboard. If we trash the pool, we will not be invited back for other activities during the year (yes, we have other activities in mind for 2nd semester).
• Cardboard must meet our quality standard and be approved by the instructor (more info to follow)
• Each boat must have a minimum of a 3" tall "sidewall" (no completely flat designs).
• All exposed cardboard must be covered in duct tape (this will reduce cardboard disintegration in the pool).
• Each team will be provided one "versa table" cardboard box piece and three 60yrd rolls of duct tape. Any materials beyond this (likely need more cardboard) need to be resourced by your team.
• Sketch Ideas - See below
• Prototype Ideas - See below
• Select an Approach - We determined that we needed a thick/wide base and high walls to keep the boat afloat with Chris inside. We decided on the thick/wide base because we thought it would help stay afloat. This worked well, for our boat did not sink at all until we intended it to.
• Surface area! - Calculate how much surface area you can cover with your given duct tape. How many sf can you cover with one roll? How many can you cover with all your rolls? What % efficiency do you think you can achieve with your overlap?
• Build It! - See below
• The Longest - Our group stayed up until the very end of the race
• Balance Master - Chris stood up for 5 seconds
• Videographer - (we have a video, but we do not know how to upload it, please ask us to see it)
• Feedback - 
+ Boat worked very well, stayed afloat until the end of the challenge
+ Kickboard paddle worked well, helped Chris go faster and did not get in the way
- Erik was not there to push the boat, so our planned speed was derailed
- Boat go as fast as other groups
+ Chris did a good job piloting
+ There were no holes in the duct tape
+ Boat was easy to drain water out of
- Could've used a string like the winning team did
- Could've had someone in the water
+ Worked well as a team to achieve goals
• How Low Did You Go? - Our boat basically more or less sat on the surface of the water. In my opinion, it was very surprising seeing how little our boat went into the water, for last year our boat was about half in the water. The unit weight of water in pounds is roughly 62 pounds per foot cubed. I weigh roughly 120 pounds. Use math to help explain the depth that your boat sat in the water.
• Redesign - I would make the boat longer, and add more cardboard to the bottom to reinforce it. I would keep the width the same, so I could still be able to paddle easily.
• (Make Your Own Achievement) - Paddle On! -Our group didn't have anyone to push our boat, so we had to get creative and use a paddle board to paddle our boat to the other side.

- This is one of our prototypes

-Aerial view of previous prototype

-The prototype that we based some of our boat off of

-Modified original prototype and added the nose on this one

-This is the front view of "The War Horse"

-Side view


-This is our boat after the contest, as you can see, it is still in tact
 -These are our 20 solutions, with a sketch of our product

Wednesday, November 20, 2013

My First Blog Post!

Welcome to my Principles of Engineering Blog for Coronado High school! I will be posting all of my work for the 2013-2014 school year.


This is the logo for my favorite football team, the San Diego Chargers. Been a fan since I was in 3rd grade. Extra pumped for the start of the NFL season this year!

http://www.youtube.com/watch?v=whNOfvyPpaM

Go Chargers!